How to Open the Yamaha Clavinova PF P-100 for Repairs
Opening the Yamaha Clavinova PF P-100 for service
This is a procedure on how to safely open the Yamaha Clavinova PF P-100 for maintenance. You do not have to remove the keyboard from the stand to open the top up (but you will need to lay on your back, and a flashlight may help).
Highly Recommended: Go here for the BEST piano/keyboard course I’ve seen on the Internet.
1) Record where cables go, so you know where to put them back (I photograph them, so I’ll know next time, too!)
Then, disconnect all cables from the back (including power, for safety).
(How to open the Yamaha Clavinova PF P-100 for repairs)
N.B.: This is a critical step, because if there are connectors still plugged in later, when you finally lift the cover, you may apply so much leverage to the plugged-in connectors that it will break the connector circuit board inside the Clavinova.
At the same time remove the music stand, and other things on top of the keyboard.
2) Remove the four screws at the extreme far corners of the bottom of the unit; they’re Philips-head screws through the wood base into the metal frame of the top cover.
3) In the following photo, taken from underneath the front, left corner of the keyboard shows the nearest corner screw (yellow arrow) already removed. The other three screws in this photo will be discussed later in this procedure.
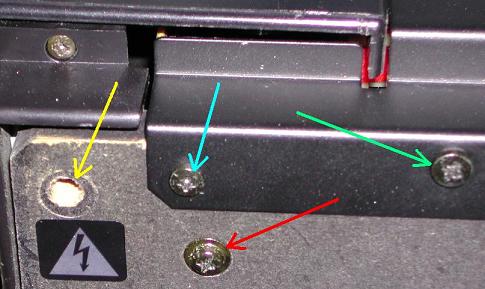
4) Despite what the Service Manual says, the cover will not open at this point, because it is still being held by a screw (shown here in red). Remove that fifth screw
5) Grasp the top by the extreme left and right ends, close to the front of the keyboard, and slowly lift up. The hinges allow the top to fold far enough back that it remains stable (below, leaned against a love seat, on a carpeted floor). Do not open further than approximately vertical to avoid breaking the caseworks.

This shows the keyboard opened after all the steps. The battery is circled in red on the green circuit board screwed to the underside of the top of the entire unit. This also shows the black metal “Front Rail Assembly” removed to expose the very front edges of the keys.
(How to open the Yamaha Clavinova PF P-100 for repairs)
Removing the Front Rail Assembly
Sometime, you may need to gain access to the keys themselves to repair them. There is a black metal bar that protects the front edge of the keys (called the “Front Rail Assembly”), pay attention to how it’s attached. That assembly has two different kinds of screws attaching it to the wooden base of the Clavinova.
There are a couple of wood screws (an example is shown in blue on the screw layout first photo above), there are also a group of machine screws, located even closer to the front edge of the rail (shown in green in first photo). What’s interesting is that the machine screws fit into slots along the front edge of the base:
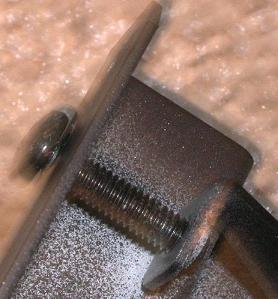
A retained machine screw in the Front Rail Assembly
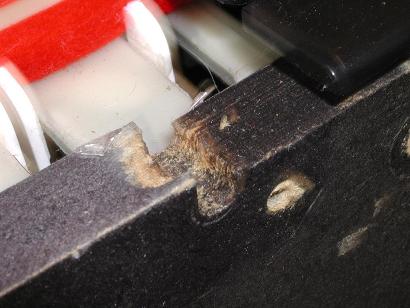
The slots for Rail’s machine screws in the wooden base
So, the machine screws hold the Rail to the wooden base by pinchingthe rail to the base.
If you completely remove the machine screws, you’ll have the devil’s own time trying to get them to realign in the threaded holes in the little metal tab on the rail. So, unscrew these screws only enough to loosen them, then completely remove the other, wood screws. The rail assembly will slide right off.
Battery Replacement
The battery is a common CR3032 lithium cell, available from any drugstore’s photo department, but it’s attached in a way I have yet to decipher. It is not clear whether it uses an odd retention assembly, or the battery is soldered to the board.
Reassembly
Just reverse the procedures, step-by-step. Put the Front Rail Assembly back on before closing the top cover.
© 2010, Carol Anne Ogdin, Deep Woods Technology, Placerville, CA, USA. All rights reserved
Go here to read earlier post submitted by Carol Anne and to add comments.
Top of How to open the Yamaha Clavinova PF P-100 for repairs


Search This Site:

Recommended For You
Learn to play piano and keyboards:

Click here to learn how to play keyboards and piano (with Piano For All).
Go here to buy a Yamaha keyboard.
Check out How To Read Music Fast: A 4-Step Beginner's Guide To Reading Music Quickly And Easily.
New! Comments
Have your say about what you just read! Leave me a comment in the box below.